Installation Write-Up By Johnathan Kazmierczak
This is Teraflex's top of the line lift. It can be installed in part or in whole as your needs see fit. In its full form the system converts the stock upper and lower control arms to long arms. It also eliminates the need for a track bar on the rear, front or both axles by using a modified threelink system. Instead of using exsisting manufactured flex joints not meant for use on vehicles for the rod ends, Tera designed custom ends specificaly for offroad use. The heavy arms will not bend easy, and the threads are extended for a wide range of length and strength. The available High Steer Kit will correct the steering after removing the track bar. The Street/Trail swaybar is the ultimate in ease of function, and ride both on and off road. Many tube frame and rock buggies use this kit as the base of the suspension. Each part can be purchased individually so you can build what you want.
The Kit can be done in stages. Long arm lower only keeping the factory length Teraflex upper arms. This will improve the ride and drivabiliy. Replacing the rear uppers will eliminate the track bar in the rear. Finally replacing the front uppers will eliminate the front trackbar, this requires the Highsteer kit to eliminate the bumpsteer induced by the factory steering without a trackbar. YOU CAN choose what you want and how you want.
Check out Tera's web site for further details as there are many choices to make. http://www.teraflex.biz
click here for LCG information on Tera's web site.
Installing the Tera LCG kit is no small task. It is one of the most labor intensive kits on the market. First, lets look at what you need to have, as doing this properly is very important.
Read the company instructions on this kit first, memorize them, this write up is a guide, not instructions.
Teraflex High Steering Kit installation Instructions
Teraflex Low Center of Gravity 4 inch lift installation instructions
Plan on 20 hours of labor to do this kit. It goes quick, but the double checking and getting things that I didn't plan on took longer.
Some things you will need in addition to this kit:
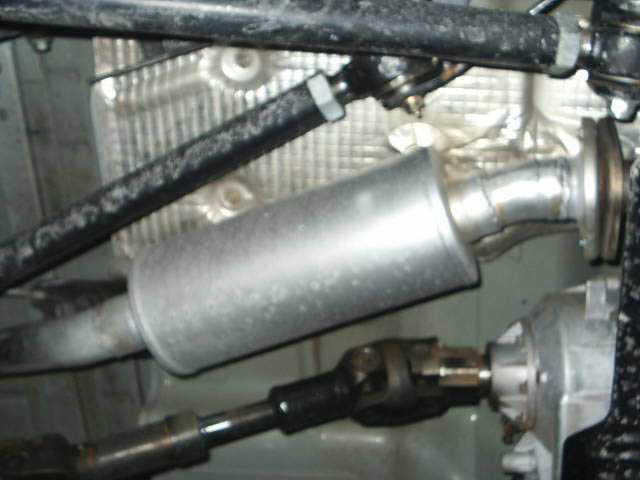
You need a new muffler and pipes from the cat back, no getting around this. You have to get a shop to make this for you, there are no prefabs available. Be prepared for the cost. (Around $300) You have to use a new muffler and it is a custom routing. It will need to be a small canister style.
 |
 |
 |
 |
 |
You also need the new skid plate from tera, you can cut your old one but the labor and such warrant just getting the belly up with the arm slots in it.
You will want to get a short shaft kit, four inches is too much for a slip yoke. Even if you keep the slip yoke you will need a new shaft anyway, might as well save the cash and do it once. Plan on purchasing slip yoke eliminator kit and shaft and save headaches.
You will need to upgrade your steering. The steering upgrade includes a high steer knuckle for your Dana 30, this is necessary to eliminate bump steer. You cannot use your old steering, it is too weak and the angles are sooooo wrong when the track bar is eliminated
The stock sway bar can be used, but I suggest the S/T sway bar. It is much easier to operate and improves the handling over the stock bar on a lifted vehicle.
You will need hand tools, pitman arm puller, die cutter, grinder, welder, two sets of jack stands, pickle forks, the Tera instructions, air tools, welder, and time.
This is the time to install a body lift if you so want. I suggest a one inch. If you plan to do a 1” belly up plate do not bother with the drop bracket for the transfer case shift lever. If you plan on lifting the engine mounts one inch you may not need to relocate the fan shroud. You still need to correct the steering brace with a one inch bracket. I will not get into this any further, you will have the instructions for your specific body lift, and you can also read this page on the M.O.R.E. 1 Inch Body Lift.

First, you need a place to put the jeep up for a few weeks, preferably a shop that will do it for you. You need to get the jeep up high enough to work on it for hours at a time without stress to your back and room for tools to maneuver. If you have access to a lift I suggest this. If you do it on the floor you will hate yourself. Lift the jeep up as high as you can safely get it, place the jack stands (or lift arms) on the body mounts. If you place them on the frame you will have to move them in mid work. Place the other jack stands on the front and rear of the jeep for extra safety.
After you have set the Jeep in place remove the wheels and drop the axles, remove the drive lines, shocks, springs, brake line in the rear (upper bracket drivers side), calipers on the front, remove the front control arms, steering links, and finally all the control arms. Pull the front and rear axles out from under the jeep. Set them aside, we will play with them in a bit.
Now you need to get a jack stand to hold the transmission. Place the jack under the tranny and jack it up to assist in the removal of the skid plate. Remove the four bolts that hold the tranny mount in place on the skid. Carefully and thoughtfully remove the six bolts that hold the plate in place, and the plate will drop freely onto your face.
Now is the time to remove your transfer case and do the short shaft conversion/ 2wlo kit/teralow 4:1 kit, or Atlas.
With the plate and tcase removed, it is time to pull the muffler. Depending on the year of the TJ you will have two or four bolts at the manifold, and one or two O2 sensors. Be careful not to damage the sensors. Pull the pipes out and put them aside. You now have room to remove the front upper brackets.
Once you have the frame mounts cut off its time to play with the axle brackets.
Now you have to remove the frame mounted brackets for the control arms. The best way to do this is to cut the bracket just below the weld on the frame, be very careful to not cut into the frame. (If you do, you may weld the hole and grind it flush again.) once you have cut to a good depth on the bracket you can take an air chisel and chisel the bracket off at the cut. Then take your grinder and grind off the rest of the weld. You need to remove all four lower brackets and the front upper brackets. The front uppers need to be especially clean and well done. The upper rears do not need to be removed. I removed the passenger side upper for practice. You need the drivers upper rear as the hole for the brake line bracket is there. |
 |
 |

Front axle; DO NOT REMOVE THE LOWER BRACKETS, you need these. Do not cut into the axle tube. You do not really have to remove any control arm brackets on the front, but I removed the track bar bracket and the upper passenger-side bracket. You can also hack off the diff upper mount, but it is not necessary. As you can see the track bar bracket is gone as well as the sway bar brackets and upper front control arm mount.

If you are doing the steering conversion, you will need to remove the sway bar mounts. This is a good time to remove the stock steering system. (High steer kit) Get an impact gun and pull the nut off of the pitman arm. Use a pitman arm puller to remove the arm. Place the new pitman arm on in the same position and use locktight and gun it down to the specified torque.
Rear axle, you need to remove all the control arm brackets, and the track bar bracket. Do not cut into the axle tube. You will also cut off the shock mounts. All that will be left on the axle is your spring pads, and sway bar mounts.


Put the channels back on, make sure they are in place all the way to the rear, (use the dead blow hammer if you have too) and tighten all of the six bolts up tight. Go ahead and prep for welding, (disconnect the battery) and then weld the four stitch welds, and the inside frame above and around the control arm brackets. Clean up the welds and paint.
You can now install the skid plate. You must modify your old plate to fit around the arms, or purchase the proper plate from Tera. We purchased the proper plate, and it bolted right up and lifted the Tcase one inch for belly up clearance.
Place the rear upper brackets in place. The instructions say flush with the rear body mounts. I put mine as close as I could, as they would not butt up cleanly. Then I found some hole in the frame and measured from there to make sure they were in the same position. Mark the frame on the inside where the bracket touches the frame and on the outside where the bracket hooks over near the body mount. Clean the paint off. I re-measured and then measured again, and then made sure that the bracket was in the right place. I then measured again and welded the bracket onto the frame. The drivers side bracket fits over the brake lines and other electrical lines. Be careful when welding to not burn these.
The front brackets fit with the mount on the outside of the frame. Place the bracket on the frame and run a bolt through the hole in the frame. (This is a crumple hole, so the frame will collapse in this spot in a wreck) Then run a bolt through the top of the bracket. With the dead blow hammer, whack the bracket back and up. You want the bolt as far back into the hole as possible, and the bottom of the bracket up as flush to the body as possible. Do this on both sides. You will then mark the frame, I marked all the way around.

Replace the brackets like above, making sure the bracket is as far back as it will go, and as flush with the body as it will get. Tighten the two bolts and weld the bracket into place, I had the sides and bottom fully welded.
The belly up skid can be bolted into place and the Tcase mounted to it. If you did not purchase the skid and wish to use your old one, you must cut it to allow the lower arms to clear. I did not do this, and have no advice other than for the time and effort, get the proper skid.
When you have all the brackets welded on the frame we can move to the front axle. The bracket for the upper triangulated links needs to be in the middle of the axle. With the axle on the stand, place the bracket and u-bolt it on loosely. Now, with a tape measure, measure from the zurk fitting on top of a knuckle to the center of the bracket. Then do this on the other side until you have the bracket centered. Now the bracket must be parallel with the face of the diff. Put the angle finder or bubble level on the face of the diff, get it to where it is level. Then using the level, place the front face of the bracket so it is the same as the diff.
Once you have it in place, tighten it down and double check. We welded mine in place.
Take the front arms and mount them to the body, Preset the length of the arms 33 ½ inches on the bottom and 28 inches on the top. Using the floor jack position the axle under the jeep, and line it up. Bolt the arms up (loosely).

Place the springs on the axle, up over the bump stops Place the springclips on the springs to hold them in place. Jack the axle up to where you can attach the shocks. The springs will be just unseated at the top, or just starting compression.
With the axle somewhat secure, remove the passenger side knuckle. To do this, you must pull the brakes and remove the rotor. You need to pull the bearing assembly. There are three 12 point 13mm bolts on the back of the knuckle. Remove them. The bearing may come out easy. If it does not, use dummy bolts threaded back into the carrier and use an air hammer to push the bearing carrier out. Remove the carrier and the passenger side shaft will come out. Oil may come out of the tube, To help keep this from happening have the axle jacked up on the passenger side a bit. Remove the two carter pins and nuts holding it to the axle. You can use a Puller, BFH dead blow, (if you don’t care to save it) air hammer, or just a big sledge to remove the knuckle. Hitting it on the top of the knuckle, you can pop it off. Place the new high steer knuckle in place and tighten the nuts to proper torque, and insert the keys


 |
 |
 |


Put the bump stop extensions in the springs. Place the rear axle under the Jeep and attach the arms. Place the springs on the pads and bolt the stops on to the pad. They will hold the springs in place. Lift the axle into position and attach the shocks.
Place the tires on the axles and drop the jeep down. Make sure the axles are centered. Check the driveline angles. To adjust the axle position left to right. Use the upper links. If you have a straight frame and positioned the front center bracket properly, they should be the same length. If you shorten one you must lengthen the other to maintain the castor. Set the lower arms to the exact same length, the alignment shop will use these to set the castor and thrust angle. Set the rear the same. Make sure the pinion angle is such that it is pointed at the transfer case output. Adjust the steering so that the tires basically point straight, and tighten it down. Do not drive this on the road in this condition, get an alignment first.Raise the Jeep up again and tighten all the fittings, bolts and lock nuts that you can, except the ends with the rubber bushings. You need to tighten these when the Jeep is on the ground. Make sure you reattach the rear brake line and bleed the brakes.
Attach the sway bar extensions or disconnects (front and rear). Attach the sway bars.
Double check all bolts and nuts, locktight and use a torque wrench on all bolts. This is your suspension. If an upper arm comes off, bad things happen. If a lower arm comes off, other bad things can happen. Don’t get excited. Do it right.
IMPORTANT. Grease all the zurks on the arms before you drive the Jeep.
Take the Jeep to a very reputable alignment shop. You just spent thousands of dollars on a system, no need to skimp on the final set up. Tell them you want a full alignment, including thrust angles, and straighten the steering wheel.
Take the Jeep to the Muffler shop. Show them these pictures, and tell them that’s how it needs to be run. I have a turbo max 6 inch muffler. It’s the largest most quiet one I could find. It still sounds good though.
|
|
|
|
|
This is a message from Tera regarding the muffler.
“The recommended muffler is a Magnaflow 10416 which is a 4 inch round with2.5 inlet and outlet. A quieter solution is the Magnaflow 12616 which is a 6
inch round. It fits but is a tight squeeze between the drive shaft and upper
control arm.
Rand Ridges
Tera Manufacturing Inc
Phone: 801/288-2585

Ok so I went out to the desert at 29rd near the airport and found a ditch to play in. As one axle dropped the body leaned over and then the second axle came in and the body leveled out. As I came out the jeep leaned about the same on the way out. overall I would say the system is well balanced and travel is about equal all the way around.
Shown with 31" tires.

The rear is near full drop, This is with 31" tires and you can see that they don’t seem to fit well. However they allowed me to see up and under well enough to verify everything was free and clear.
Shown with 31" tires.

This is the same situation as above, but from the rear. Notice how much room the 31"s have.

Near full drop on the front. The brake lines are long enough with just the relocation brackets and are not in the way.

Notice how the long arms keep the axles in position under the springs. This lessens the so called "rear steer" effect. Its still there but not as bad and easier to control.
Shown with 31" tires.

I was playing on a rock. Rock was not big enough.
Not fully flexed, but room for 35" and up to 37" tires.
Shown with 31" tires.

Ok I purchased bald 35" tires. (I really wanted the rims, 5 for $300.00 15x10 3.75" backspace) So I put them on to see how they would clear and went back to 29 road. The tires *just* touch the flares.

Ok the front may be iffy if I have to turn, but hey that’s why the flares are flexible. Is that enough stuff? There is about 1/4" before I hit the joint holding the flare to the fender. Just enough fore new tires.

The rear bump stops could be shortened just a bit allowing for more up travel, but not much more.
Show with 35 inch tires.

The only feasable way to get more travel would be to go to six inch springs and hoops or coilovers. As it is now the springs just unseat at full drop and are just short of over compression.
Most observers that do not know my Jeep think that there is a locker or limited slip in the rear. I cannot tell you howmany times I have heard, "Your lockers not working." or, "Use your brake to engage your limited slip" on a really tough spot. I will tell the person that I do not have a locker or LS and then they kinda look stunned and ask how I got up the other stuff soooo well. I guess its my driving skills....
One Year Impressions
Its been one year since the install. I grease the fittings every month, and after wet muddy trips.The Kit is still solid and quiet. I am very happy with the lift. It has performed without any complications or complaints. I do wish I had longer shocks and springs. I am working on a front coilover for it. I will be working on a writeup for the RS9000 coilovers soon.
3-8-2005