Body - Water Leaks to the Interior
BODY
BO026-00
REVISED
October 27, 2000
Title:
WATER LEAK FIELD-FIX REPAIR INSTRUCTIONS
Models:
'97 - '03 Tacoma
TSB Revision Notice :August 25, 2003; VIN and Applicable Model Information has changed, and repair procedure has been expanded and clarified.
October
27, 2000; This TSB updates B0016-98 dated June 12, 1998.
The previous TSBs should be discarded.
Introduction
Use the following field-fix procedures if water is present on the floor carpeting and it can be confirmed that the water is leaking into the cab from either the upper cowl or side cowl seam, or moisture barrier behind the door trim panel.
Applicable Vehicles

^ 1997 - 2003 model year Tacoma vehicles produced BEFORE the VIN shown.
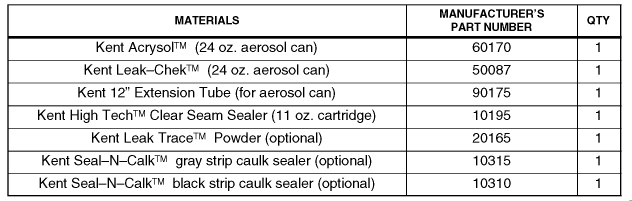
Required Materials
NOTE: Parts can be obtained from the local Kent(TM) representative or from Kent(TM) nationally at 1-800-654-6333.

Warranty Information
Applicable warranty *:
This repair is covered under the Toyota Basic Warranty. This warranty is in effect for 36 months or 36,000 miles, whichever occurs first, from the vehicle's in-service date.
* Warranty
application is limited to correction of a problem based upon a customer's
specific complaint.
Repair Procedure
1. Remove Wiper Arms, Plastic Cowl Cover and Wiper Motor (store wiper links up Procedure against bottom of windshield).
NOTE:
Mark wiper arm linkage attached to wiper motor and wiper motor splined
shaft prior to removing the 12 mm retaining nut.
2. Spray Acrysol(TM) under entire lip of 1/2" pinch weld and wipe
dry with a clean paper towel.
FOLLOW DIRECTIONS ON SIDE OF CAN CAREFULLY.
Dry open seam with compressed air prior to applying sealer.
NOTE:
Do not use a red shop towel to wipe surfaces because shop towels are contaminated
with silicone.

3. Apply a small bead of Kent High Tech(TM) Clear Seam Sealer to underside
front edge of the pinch weld from fender to fender as shown.

4. Apply Kent High Tech(TM) Clear Seam Sealer on all spot welds located
on the floor of cowl panel.
5. Apply Kent High Tech(TM) Clear Seam Sealer around outside base of hood
safety stops, and seal outside corner, under the "L" bracket
as shown.
6. Mask-off wiper motor opening.
7. Attach Kent(TM) 12" extension tube (P/N 90175) to the nozzle on
the can of Leak-Chek(TM) (P/N 50087).
NOTE:
Direct Leak-Chek(TM) spray material approximately 1 inch above seam. Spray
force is very strong - make several test passes before actually spraying
material into seam.

8. Spray Leak-Chek(TM) through the wiper motor opening.
a. Spray
material inside upper cowl, beginning in lower corner, and continuing
toward the centerline of vehicle.
b. Remove wand from the wiper motor opening and insert it into larger
cowl openings on the right hand side. Continue spraying material along
entire seam until seam is filled from R/F fender to L/F fender area.
Spray
Leak-Chek(TM) into seam a total of 3 times, allowing Leak-Chek(TM) to
flash dry for 30-45 minutes between applications. (Drying time increases
as outside temperature decreases.)
9. After final application of Leak-Chek(TM) has been allowed to dry for
approximately one hour, flood area with water for 5-10 minutes.

NOTE: Hold garden hose at top right front corner of windshield and point
hose downward toward lower right hand corner of windshield as shown.
10. Check
inside cab behind Heater/Air Conditioner box for evidence of water leakage
during water leak check.
11. Carefully inspect "T" joint on right and left sides (close
to heater motor box, and brake booster) for evidence of water leaks.
12. If no leaks are found, cowl area leak repair is complete. Reinstall
wiper motor, cowl trim panel, wiper arms, and hood.
Wiper Arm Torque: 20 N.m (205 kgf.cm, 15 ft.lbf.)
If water
leaks are still present and are coming in from the cowl area, remove right
front fender and proceed as follows:
13. Seal around entire perimeter of "L" bracket with Kent High
Tech(TM) Clear Seam Sealer (see drawing for location of "L"
bracket).
14. Using a flashlight, look through the 2" x 3" rectangular
hole on side of vertical cowl panel and locate vertical seam that connects
side of cowl to front cowl.
If seam is not sealed properly, clean vertical and horizontal seam area with Acrysol(TM) cleaner. Use an air hose to dry all seams before applying sealer.
NOTE:
Hole is located behind fender.
15. Attach a 12 to 18 inch length of plastic tubing to tip of Kent High
Tech(TM) Clear Seam Sealer.
16. Seal entire vertical joint with High-Tech(TM) clear seam sealer. Allow
sealer to dry according to instructions on tube.

NOTE: Seams are inside boxed area and accessed through the square hole
as shown.
17. Flood cowl area with water to confirm that there are no cowl seam
leaks into cab.
If water
leaks are still present and there are no cowl area seam leaks, reinstall
front fender and inspect for water entry along lower edge of interior
door trim panel; then proceed as follows:
18. Remove door trim panel.
19. Flood R/F door glass area (spray water at door glass, belt-molding
area).
20. Inspect sealer between plastic sheeting (moisture barrier) and metal
door panel for voids/skips in sealer.
If there are voids/skips between the plastic sheet and the door panel, it will need to be resealed.
A. Using
a heat gun, heat the butyl tape securing the plastic sheet to make removal
easier.
B. Use Kent Acrysol to clean the door panel and plastic sheet.
NOTE: ^ Follow the directions provided by the cleaning agent.
^ To ensure proper sealing of the plastic sheeting, it is important that
the door panel and plastic sheeting is extremely clean.
C. Use 3M 8.0 mm butyl tape (P/N 08610) to reattach the plastic sheet
to the door panel. Make sure there is a continuous solid bead sealing
the plastic sheet to the door panel.
21. Inspect drain-back holes (small slits in metal door panel, near bottom
of sealer) to determine if holes are covered by sealer material.
If sealer
covers drain-back holes (small slits in metal door panel) carefully pull
up a portion of plastic sheet, clean out drain-back holes and reinstall
plastic sheet against metal door panel. Confirm that there are no voids
between sealer and plastic sheet and between sealer and metal door panel.
22. Flood all areas with water to confirm that there are no leaks into
cab area.
23. If no leaks are present, reinstall door trim panel.
9-10-2004